DIY / How to Build a Desk
A few month ago I started a new part time job. When I began working for print and homeware design studio Place in Print myself and the owner moved into another space so we could have a nice area to work in away from the workshop. The problem was that lots of the old furniture from the workshop space didn't really work in the new studio, so we decided to build our own desk inspired by this one from the blog My Attic.
A bit of a daunting task but it ended up being so fun! Granted, I didn't really do any of the hardcore DIY (I mainly varnished and painted) but we ended up with a pretty cool and totally bespoke desk. It has some pretty clever features too which I'll go into into in the tutorial. If you're willing to spend some time getting covered in paint and sawdust it is totally worth building your own furniture - and so much cheaper! Check out the tutorial below...
You will need to measure your space so you can plan out how big you'd like your desk to be. Ours had to comfortably sit two of us with our large computers. Two more people, maybe six at a push could work around our desk, it is very big. Make sure yours fits your needs and keep in mind you may need more space later on if you need to add people or equipment.
What You'll Need:
Two OSB panels
Four 2x4 lengths of timber or wooden floor boards
A box of 2" screws
Power saw
Power drill
Hammer
Varnish (we used Yacht varnish so the desk could be used outdoors)
White emulsion paint
Paint brushes
Trestle legs
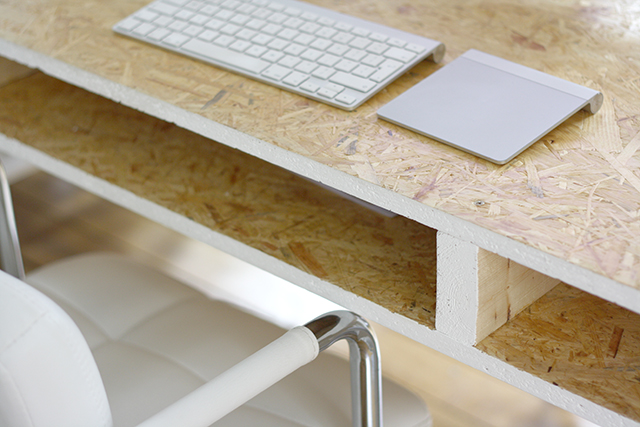
We had our 2x4s cut down to the size that we needed in B&Q where we bought all the supplies. It takes some maths figuring out the measurements but for a rectangular table you'll need two 2x4s cut to the length of the finished desk and two shorter ones that run from the edge of the desk to the centre channel created by the two longer 2x4s. We wanted an open channel to run down the centre of the desk so our computer cables could be kept tidy and invisible. You can make the cubby holes whatever size you'd like to, ours are rectangular to keep books and papers in.
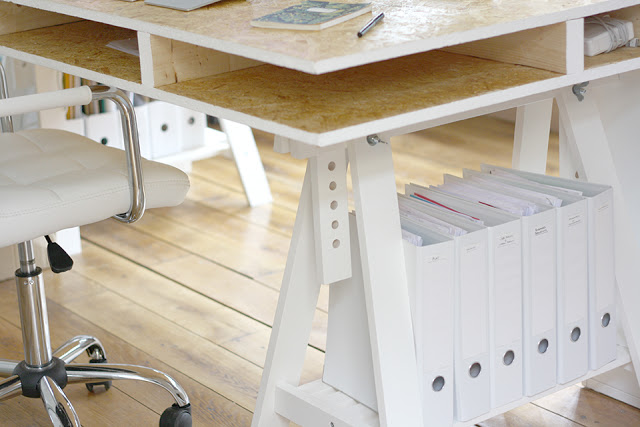
Lay one of the OSB boards down and drill the 2x4s into place on top of the OSB. The 2x4s should form a hashtag like shape on the OSB board. Not only will the 2x4s make up your cubby holes to keep cables and notebooks hidden but they will also add more stability to your table. We cut a small rectangle out of the middle of the second OSB board so we could feed our wires through it to plug into an extension cable that sits in the channel. We cut the hole at an angle so that we could have a lid for it. Add the second layer of the OSB table body and screw into the 2x4 boards. This will create a kind of sandwich over the 2x4s.
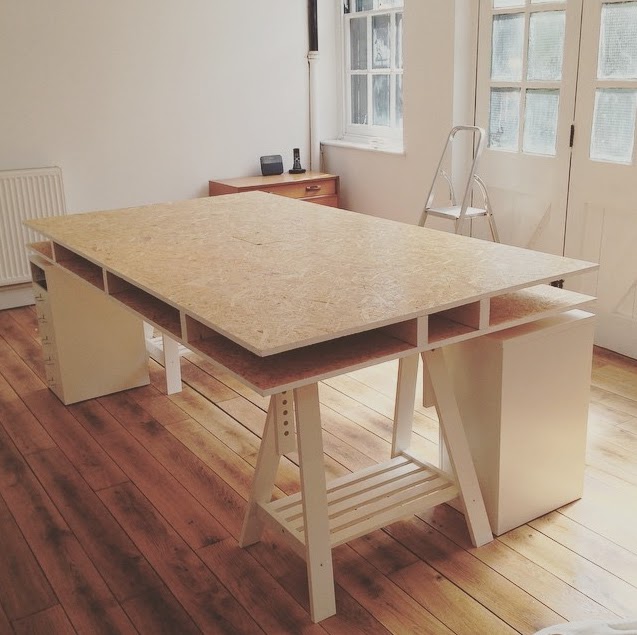
The desk top will be very heavy now so make sure you have a few helpers to lift it up. For the legs we bought these trestle legs from Ikea. They take the weight of the desk and our stuff very well so don't worry about them buckling.
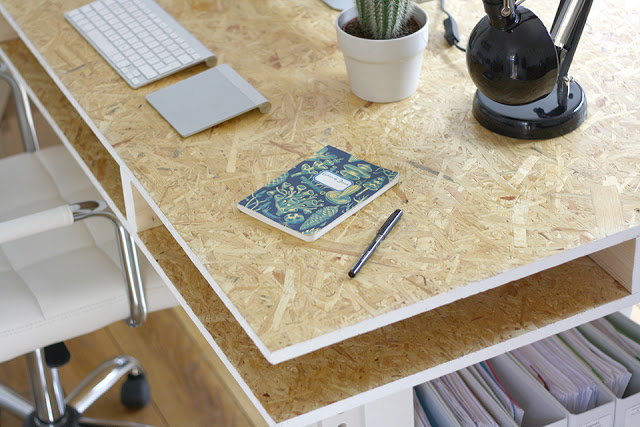
The last stage is to sand down the edges of the table so you can paint and varnish it. I painted on a few coats of thick varnish following the instructions on the can and then added a border of white paint along the exposed edges to give it a clean and modern finish. This last step is optional and I think any paint colour would look great. It turns out that OSB makes a really cool background for photos too!

Here's an instagram shot of the finished desk before we moved the other furniture in. You can see from the photo that our lidded hole in the middle of the desk for the computer cables is pretty much invisible.
Best of luck building your own desk and please let me know what you think of this tutorial!

A bit of a daunting task but it ended up being so fun! Granted, I didn't really do any of the hardcore DIY (I mainly varnished and painted) but we ended up with a pretty cool and totally bespoke desk. It has some pretty clever features too which I'll go into into in the tutorial. If you're willing to spend some time getting covered in paint and sawdust it is totally worth building your own furniture - and so much cheaper! Check out the tutorial below...
You will need to measure your space so you can plan out how big you'd like your desk to be. Ours had to comfortably sit two of us with our large computers. Two more people, maybe six at a push could work around our desk, it is very big. Make sure yours fits your needs and keep in mind you may need more space later on if you need to add people or equipment.
What You'll Need:
Two OSB panels
Four 2x4 lengths of timber or wooden floor boards
A box of 2" screws
Power saw
Power drill
Hammer
Varnish (we used Yacht varnish so the desk could be used outdoors)
White emulsion paint
Paint brushes
Trestle legs
We had our 2x4s cut down to the size that we needed in B&Q where we bought all the supplies. It takes some maths figuring out the measurements but for a rectangular table you'll need two 2x4s cut to the length of the finished desk and two shorter ones that run from the edge of the desk to the centre channel created by the two longer 2x4s. We wanted an open channel to run down the centre of the desk so our computer cables could be kept tidy and invisible. You can make the cubby holes whatever size you'd like to, ours are rectangular to keep books and papers in.
Lay one of the OSB boards down and drill the 2x4s into place on top of the OSB. The 2x4s should form a hashtag like shape on the OSB board. Not only will the 2x4s make up your cubby holes to keep cables and notebooks hidden but they will also add more stability to your table. We cut a small rectangle out of the middle of the second OSB board so we could feed our wires through it to plug into an extension cable that sits in the channel. We cut the hole at an angle so that we could have a lid for it. Add the second layer of the OSB table body and screw into the 2x4 boards. This will create a kind of sandwich over the 2x4s.
The desk top will be very heavy now so make sure you have a few helpers to lift it up. For the legs we bought these trestle legs from Ikea. They take the weight of the desk and our stuff very well so don't worry about them buckling.
The last stage is to sand down the edges of the table so you can paint and varnish it. I painted on a few coats of thick varnish following the instructions on the can and then added a border of white paint along the exposed edges to give it a clean and modern finish. This last step is optional and I think any paint colour would look great. It turns out that OSB makes a really cool background for photos too!
Here's an instagram shot of the finished desk before we moved the other furniture in. You can see from the photo that our lidded hole in the middle of the desk for the computer cables is pretty much invisible.
Best of luck building your own desk and please let me know what you think of this tutorial!